How to automate your NPS Survey
Do you use an NPS Survey for your business? Having a great Net Promoter Score (NPS) is vital for any young startup. It’s especially important for SaaS startups that rely on retention and upsells as their main source of revenue. Every startup should have a way to track their NPS and an established process to managed this feedback.
When I recently attended the SaaStr conference, the importance of the NPS was reinforced, and it was also highly suggested that whatever feedback you receive from this survey should be acknowledged at the very least.
As part of my efforts to build a full end-to-end stack of tools and play-books for startups that enhance Productivity, I’ve compiled a process and a set of supporting tools that can be leveraged by any startup.
This diagram provides an overview of the process:
NPS Survey (Wootric)
There are a number of tools out there that provide NPS functionality. I haven’t tried them all, but I’ve been pretty happy withWootric. It displays a survey within your app at the bottom of the page, and allows you to customize the follow-up question based on the score.
I’ve set it up, so the follow-up question is displayed as follows:
For scores 0-6:
For scores 7-8:
For scores 9-10:
Zapier
Zapier, the service that allows you to connect apps together, recently released a fantastic new feature, in it’s multi-step zaps. Instead of one trigger mapping to one action, you can now sequence a series of actions after a trigger. To use the multi-step zaps, you need to be on one of their paid plans. Additionally they have added javascript support in a “Code” step so you can perform data manipulations.
Zapier is the glue that connects all the tools that are used in this process. The trigger, shown as Step 1 on the right, is a new response from Wootric, the NPS Survey tool.
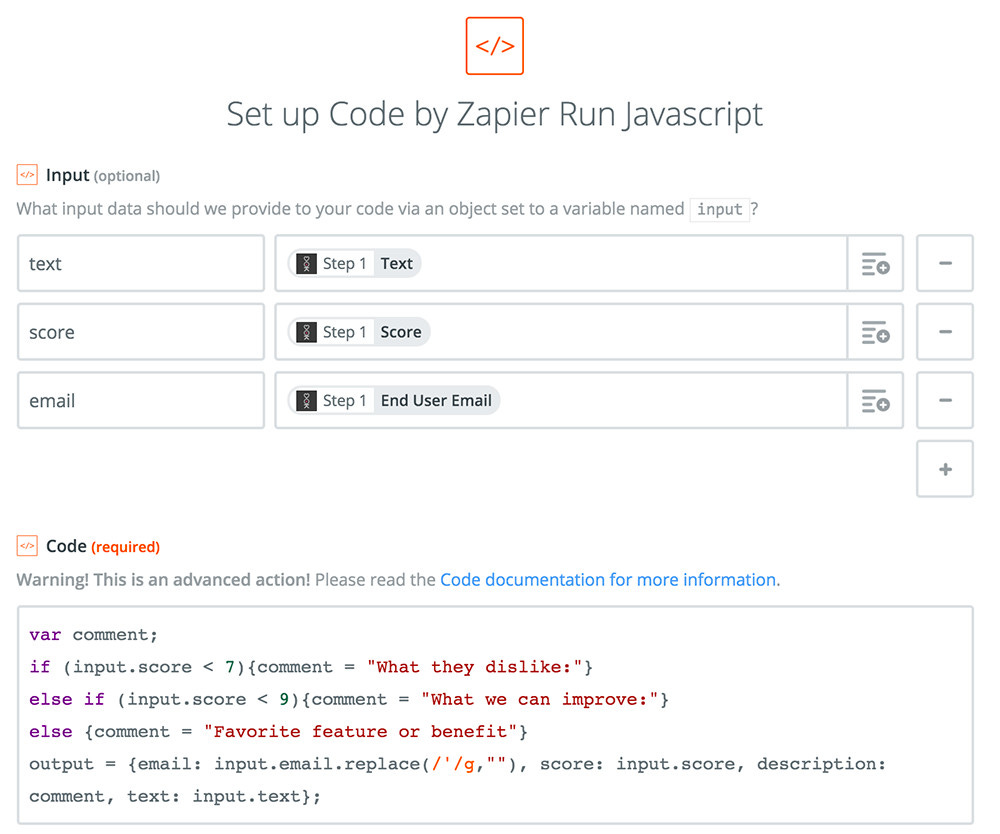
Step 2. Run Javascript to add a variable and to trim quotes from email address.
Because I ask a different follow-up question based on the NPS that is provided, I create a new variable called ‘comment’ and populate that with a label for the associated text response so we are clear on what question the user is answering. I will use this variable later in the sequence.
In this code step I also do something else. Somewhere along the line, in Wootric, some of the email addresses seem to have acquired quotes around them, some not. This may have something to do with my Segment.io integration, or another tool. I’m not sure. I could spend a whole lot of time trying to figure out where this is coming from, or I could just apply a step in the zap to remove the redundant quotes. If I keep them in, the integration with another tool, Drip, will break, so best to remove them here.
I do all this with Zapier’s code step, using Javascript.
The following diagram shows how I’ve set up this step:
Here’s the code in the image above if you want to copy it:
Slack
Step 3. Send Channel Message to Slack
When someone completes an NPS Survey, we want the team to know about it. So in the next step in the zap, I push out a message to my “customers” channel in ZootRock’s Slack account. Notice the Description variable that was created in the Javascript step is included in the Slack message.
The Slack message looks something like this, note that in this scenario the user chose not to leave a comment:
Drip
Drip is a lightweight marketing automation tool that provides email nurturing, automation and lead scoring. I’ve been using this tool for several months and have been very impressed with it. Recently, Drip released an awesome feature that I’ve been looking for, which is a visual workflow feature, allowing users to sequence a series of steps into a workflow.
Step 4. Trigger “NPS Completed” event in Drip.
I use Drip as a central repository for all events a Customer completes. That way I can craft campaigns that are extremely pertinent to the Customer. Here is how I trigger this event in my zapier step:
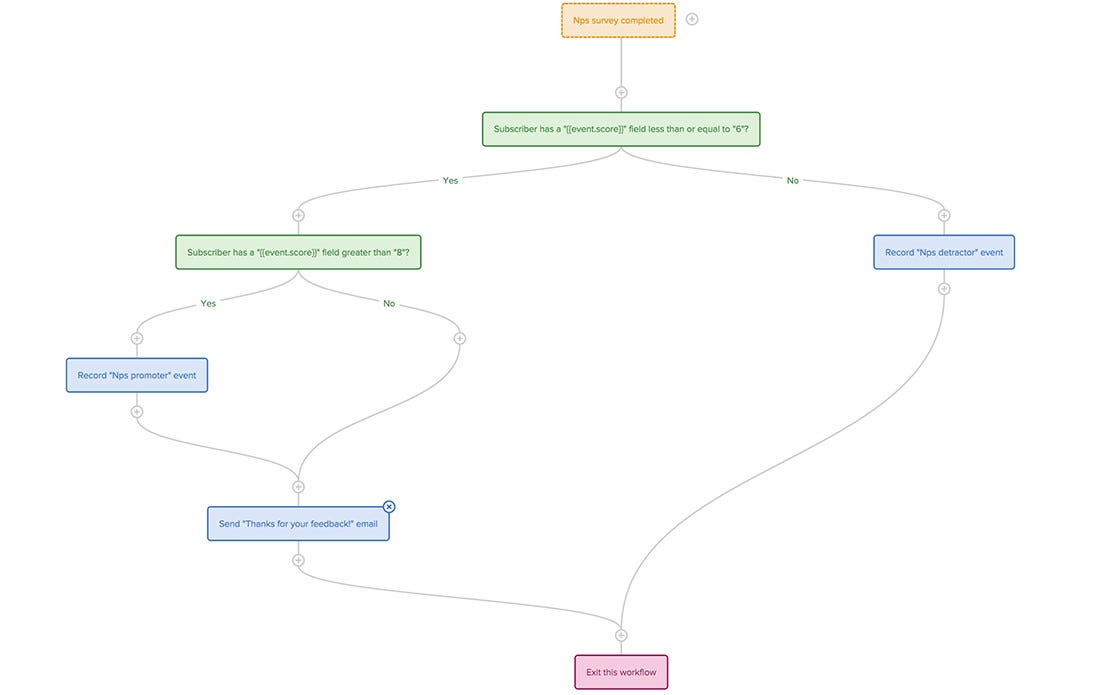
Now that Zapier is set up to create this event in Drip, there are a number of things I want Drip to execute once it receives this event.
The first thing I want to be done in Drip is to record the NPS Survey completed event in Drip. This happens automatically from the Zapier step I set up above.
If the score is a number between 0 and 6 inclusive, this is known as a Detractor score. I have created an event in Drip called “NPS Detractor”.
If the score is 7 or higher, I want to send an email thanking the Customer for their feedback.
If the score is above 8, I want to record an event on the Customer called “NPS Promoter”.
There’s one more thing I want to do in Drip. When a Customer has recorded a “NPS Promoter” event, I want it to increase their lead score, by 10 points. So I go to the Leads section of the Settings menu, and add this custom event, as per the last line in the diagram below:
Step 5. Create new Card on Pipefy in the “Respond to NPS Survey” Pipe.
I’m a big fan of Pipefy. Pipefy allows you to set up a process that can be initiated for each instance and view the status of each instance, what they call a Card. As I want to have a manual response for each NPS score under 7, I create a filter step in my zap, shown below.
Then I create another step that will create the card in Pipefy, shown below.
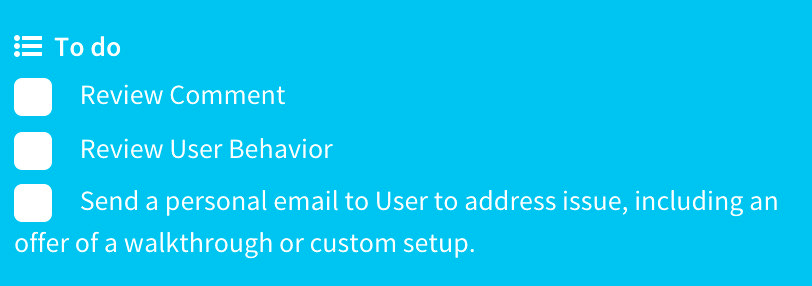
This pipe only has a few items in a checklist for now, that involve the following:
As this process develops, I may add more to this list and even automate it further. Pipefy also supports the ability to integrate with Zapier so I can set up more automated tasks if I choose.
I am waiting for early access to a couple other tools that would be beneficial in this process. Sign up for my blog updates and I’ll let you know when I’ve added an alternative process using these other brand new tools.
That’s it! Please let me know if you find this post useful and if you have any suggestions for improving the process.


